Prep
- Cut one softball size of clay per student plus extra for demonstration and students who need more.
- Set up in a tray (like rolls) and cover with a damp cloth or plastic wrap until needed.
Set Up
- Place plexiglas mirrors on tables
- Distribute the following per student: 1 Styrofoam plate with chunk of clay
Introduction/ Warm-Up
- Sing with children, “If you’re happy and you know it, clap your hands,” first verse only. Repeat a couple of times.
- Show cartoon faces with expressions. Have students determine which emotion each face is communicating (happy, angry, tired, etc.)
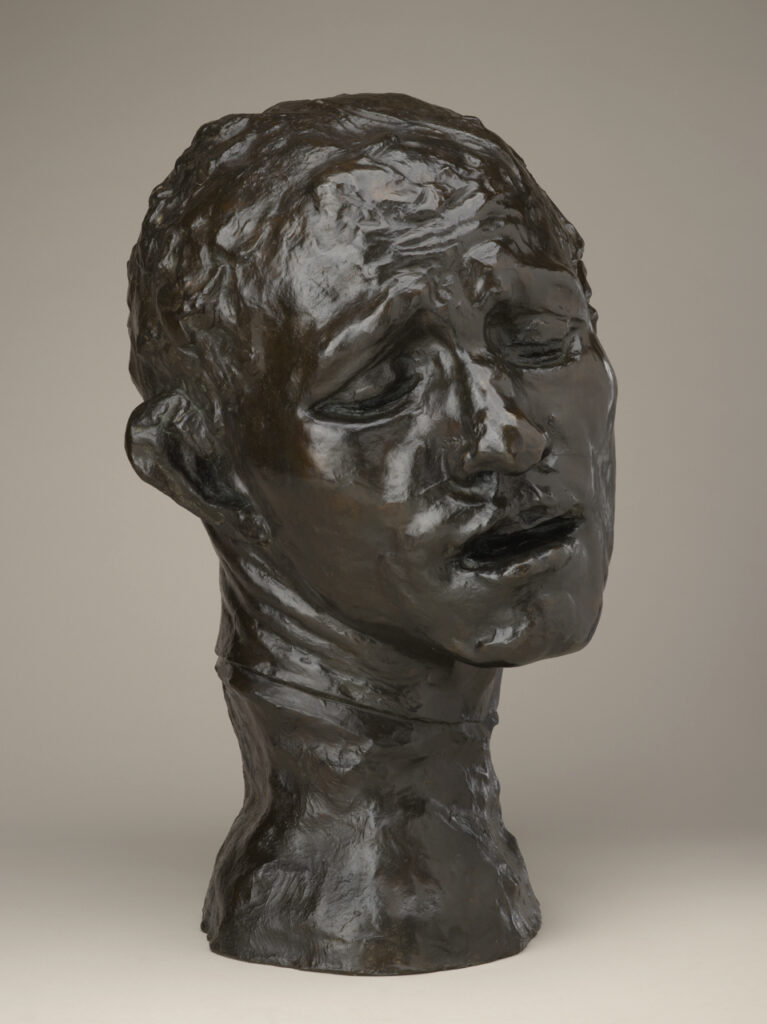
- Introduce Monumental Head of Pierre de Wissant. Invite students to talk about the figure’s facial expression.
- Ask students to notice the texture of the sculpture. Sculptures can be very smooth, very rough, and even have more than one texture.
- Tell students they will be examining their own facial expressions in a mirror at their table. Dismiss them and say: When you go to your tables, I’m going to call out a word for a feeling. Look in the mirror and make that feeling with your face. What happens to your mouth when you do that? Your eyes? Your cheeks?
Focus Activity Procedure
- Each student should have a plate with a piece of clay and a damp paper towel at his or her place.
- When the class is ready, demonstrate working with clay, kneading it, and making it soft. Have students knead the clay until it is soft.
- Ask: What emotions do you want their face to show?
- Tell students to make their clay into a ball shape by patting it between hands and rolling it on the plate.
- Tell students to use their fingers to poke eyes into the ball.
- Instruct them to use their fingers to pinch a nose. (Can add clay, if necessary).
- Show them how to use their fingers to push in a mouth.
- Ask: Do you want to add texture for hair? Do you want it to be smooth or bumpy? Use fingers to smooth and tongue depressors to add bumps or lines.
Closing
- Clean up with assistance from all teachers. More hand cleaning will be needed following the end of class.
- Have children divide in two groups and do a gallery walk led by teachers around half of the tables. As they walk past each sculpture, students should try to copy the expression on its face. Discuss what kind of expression the students are making. Happy? Sad? Surprised? Curious?
- Ask students to look for art all around them at home and at school and particularly note the different textures and expressions they see.
Written by Andrea Saenz Williams
Observe students creating expressive heads and discuss with them (while in process) the expressions their sculptures are making. Student works and descriptions may be used to assess if student can:
a. Communicate the emotion being conveyed
b. Describe their art making process using proper vocabulary (exs.: texture, clay, sculpt)
c. Understand the scale of their sculpture (Is it as big as their head?)
Vocabulary
sculpt
expression
life size
larger than life
huge
sculpture
self-portrait
texture
emotion
Materials
Teacher materials:
Cartoon line drawings of different expressions
small sculpture with texture
Student materials:
Plexiglas mirrors
nontoxic air dry clay (white)
sponges and/or paper towels
styrofoam plates (one per student)
bowls for water
wet wipes, two per student, to be passed out at end of lesson
Extension Activities for Teachers
- Look for things that are very large and very small, and then use words to describe their size. Draw pictures based on descriptive words about size, such as draw yourself as a GIANT.
Extension Activities for Families
- Talk with your family about expressions. Make silly faces together. Have a grown up help make a list of things that make you happy.
Links