How Storms Happen (lesson plan)

Abstract

Students investigate how artists observe and depict the weather in the open sea and research the factors that create weather. Small-group work is followed by a whole-class discussion on various types of weather and how weather can be traced to the sun. Students create a work of art demonstrating comprehension and observation of weather and water cycles.

Grade Levels
6th Grade, 7th Grade
Subject Areas
Science, Visual Arts
Concepts
Cycle, Force, Impact
NC Standards Correlations
Science
7.E.1.2, 7.E.1.3, 7.E.1.4, 7.E.1.5, 7.E.1.6
Visual Arts
6.V.1.1, 6.V.1.3, 6.V.1.4, 6.V.2.2, 6.V.2.3, 6.V.3.1, 6.V.3.3, 6.CX.2.2, 6.CX.2.3

Artwork Related to this Lesson

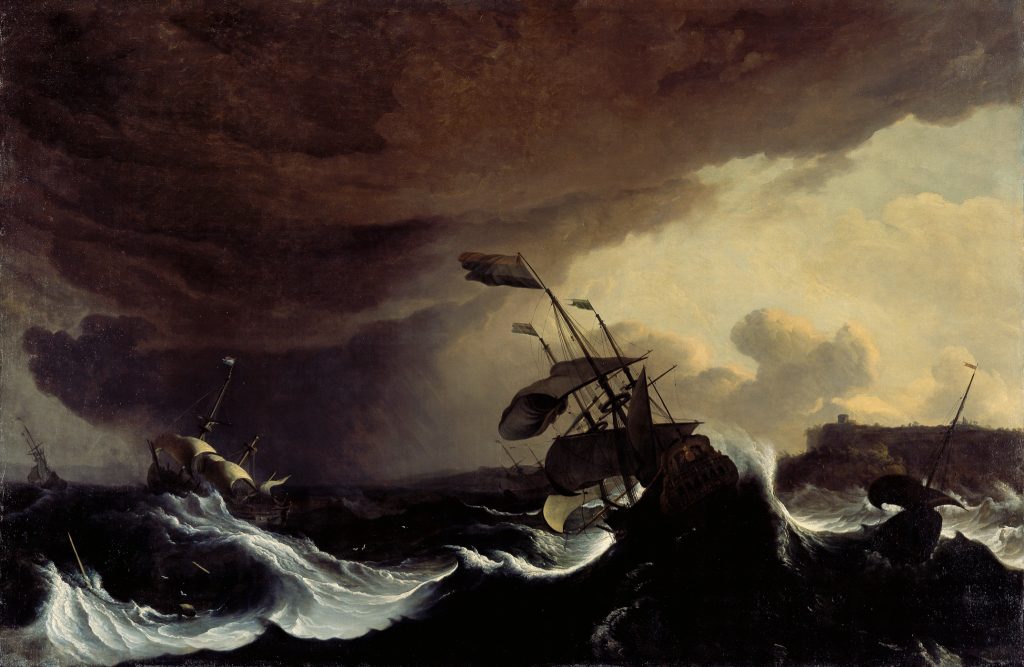
  • Ships in a Stormy Sea off a Coast

    Ships in a Stormy Sea off a Coast, by Ludolf Backhuysen

    learn more

Student Learning Objectives

  1. Students analyze and research how artists have painted storms throughout history.
  2. Students investigate weather and water cycles.
  3. Students collect and compile data on the interconnectedness of weather and water cycles as well as the influence of convection.
  4. Students work in collaborative groups to create their own weather and water cycle posters and paintings.
Use left and right arrows to navigate between tabs.

Activities

  1. Introduce the topic of thunderstorms using the focus work of art. Ask students to make observations about thunderstorms based on the artist’s representation. Sample questions:  (1) Look intently at this work of art for two minutes, and take in any and all details that make it interesting and memorable. At the end of two minutes, we will close our eyes and recall all the details. (Teacher sets a timer.) (2) Why did the artist choose to portray the ships on a stormy sea rather than in calm waters? What effect does that have on the viewer? (3) How did the artist capture this natural phenomenon in the painting? Think in terms of the way the artist used colors and shapes. (4) How do storms start; why do they happen?  Students focus on the work of art while brainstorming the factors that bring forth storms.
  2. For the follow-up experiment, the teacher can use a hot plate to boil a pan of water and then hold the cold lid over the pan to demonstrate the three steps of the water cycle: evaporation, condensation, and precipitation. The cold lid causing the warm mist to turn into water droplets also displays heat transfer via convection. As a group, discuss how and with what techniques/materials artists might represent characteristics of water.
  3. Explore how weather and the water cycle are related. Have students research what causes weather. In keeping with this topic, have students also research how artists have painted storms throughout history. Once the data is collected, the groups identify what the weather and water cycles have in common in a discussion led by the teacher. Student groups make Venn diagrams guided by the teacher comparing and contrasting the weather and water cycles (the key concept being they both start with the uneven heating of the earth’s surface, atmosphere, and earth’s water; and both are traced back to the sun). In the same Venn diagram, students itemize what they learned from their research on how artists have depicted storms (examples: gray/dark clouds, lightning, unexpected colors like red, bold brushstrokes, ships that are off kilter, animals and people running for shelter).
  4. Students divide into groups of four or five. They experiment with different ways of portraying thunderstorms as a natural force the way the artist did. How can a thunderstorm be painted to look fierce and realistic on a poster? What painting techniques and details can be employed to that end? Observe the work of art again, and study the clues; the colors, the movement, the action. Using posterboard, students have the option of (1) creating a painting showing the steps of the weather and water cycles, or (2) making a three-dimensional collage using multimedia (yarn, craft paper, old magazines, fabric scraps) demonstrating the weather and water cycles with an emphasis on thunderstorms. Each poster should depict the sun, clouds, winds, a body of water, the turmoil caused by cold air replacing the warm air, and the thunderstorm. Students may choose their own medium and method to show the storm.

Written by Fusun (Sue) Griffith

Assessments

  • Whole-class discussion and research and data collection may be used to assess students’ understanding of weather and artists’ use of the subject in art.
  • Group discussions and the Venn diagram will demonstrate students’ ability to use the language of visual arts to communicate as well as to analyze artistic expression.
  • The posters will demonstrate the students’ mastery of the essential phases of the weather and water cycles and their interconnectedness. Rubric for posters

Lesson Resources

Vocabulary

Abiotic factors: all nonliving elements in an ecosystemBiotic factors: all living factors in an ecosystemEcosystem: the relationship between the living and nonliving factors in an area functioning as a unitWater cycle, evaporation, condensation, precipitation

Materials

Hot plate, steel pan with lid, poster paper and poster boards, yarn, colored pencils, acrylic paint, watercolors, crayons, old magazines, fabric scraps, glue sticks.

Links

Image of Ships in a Stormy Sea off a Coast

Painting techniques and samples

Water cycle diagrams

World Book Web site
Related Content